Documentation
An AI support chatbot platform — train chatbots on your own knowledge, embed a chat widget on any website, hand conversations to human agents in a realtime inbox, and sell it all with subscription plans and a full admin back-office, built on Laravel.
Introduction
What the product is and how this documentation is organized.
Thank you for purchasing NeuralDesk! This guide walks you through everything from uploading the files to your server, to configuring payments, cron jobs and email — no prior Laravel experience required for shared-hosting installs.
NeuralDesk is a complete AI customer-support chatbot platform. Your customers sign up, pick a pricing plan, train a chatbot on their own content (documents, Q&A, text), and embed a chat widget on their website with one script tag. The bot answers visitors instantly from the trained knowledge; when it can't help, the conversation is handed off to a human agent in a realtime inbox — while you (the site owner) manage plans, payments, AI providers and content from a powerful admin panel.
The application ships with two panels:
- Admin Panel (
/admin) — the site owner's back-office: users, staff, pricing plans, payments & refunds, AI provider settings, frontend CMS, settings. - User Dashboard (
/dashboard) — for subscribers: chatbots, knowledge bases & training, widget setup & embed code, the conversations inbox with human handoff, team staff accounts, plan & billing.
Feature Overview
A quick tour of what's included out of the box.
Server Requirements
Verify these before purchasing hosting or starting the installation.
| Requirement | Details |
|---|---|
| PHP | Version 8.3 or higher (8.4 supported) |
| Database | MySQL 5.7+ / MariaDB 10.3+ |
| Web server | Apache (with mod_rewrite) or Nginx. Any standard cPanel / Hostinger shared hosting works. |
| PHP extensions | BCMath, Ctype, cURL, DOM, Fileinfo, GD, Intl, JSON, Mbstring, OpenSSL, PDO, pdo_mysql, Tokenizer, XML, Zip |
| PHP settings | memory_limit ≥ 256M, upload_max_filesize ≥ 32M, allow_url_fopen enabled |
| Cron jobs | Ability to add cron jobs (available on virtually all hosts) — required for scheduled emails & background jobs |
| SSL certificate | Strongly recommended (free Let's Encrypt / AutoSSL is fine) — required for web push notifications and live payment gateways |
vendor/ included), assets pre-built, and a ready-to-import database.sql. The entire installation is point-and-click: upload files, create a database, edit one config file, import the SQL.Package Contents
What you get after unzipping the CodeCanyon download.
your-purchase.zip
├── Files/              ← the application files (upload these to your server)
├── Database/
│   └── database.sql    ← ready-to-import database (import via phpMyAdmin)
└── Documentation/      ← this documentation
Inside Files/, the application has an important structure — the Laravel app lives inside the system/ folder while the web root files sit at the top level:
public_html/            ← your domain's document root
├── index.php           ← front controller (loads system/)
├── .htaccess
├── assets/             ← compiled CSS/JS, images
└── system/             ← the Laravel application
    ├── .env            ← YOUR configuration file
    ├── app/  config/  routes/  database/  vendor/ ...
Files folder, select everything inside it (not the folder itself), and compress the selection into a zip — call it main.zip (Windows: right-click → Send to → Compressed folder; macOS: right-click → Compress). The guides below upload and extract this zip. Because the document root files are at the top level, it extracts straight into public_html — no "point the domain to /public" gymnastics needed.Before You Install
The 10-minute plan, whichever host you use.
Every installation follows the same five moves. The pictorial guides below show exactly where to click for cPanel and Hostinger:
- Upload & extract
main.zip(the zip you created from theFilesfolder's contents) into your domain's document root. - Create a MySQL database + database user, and grant the user all privileges.
- Edit
system/.env— set your app URL and database credentials. - Import
database.sqlwith phpMyAdmin — no terminal or commands needed. - Add two cron jobs — the scheduler and the queue worker.
main.zip you created from the Files folder (see Package Contents), the Database/database.sql file, and 10–15 free minutes. Make sure your hosting PHP version is set to 8.3 or 8.4 first (shown in each guide).Install on cPanel Pictorial Guide
Step-by-step with illustrations. Works on any cPanel host (Namecheap, GoDaddy, A2, Bluehost, etc.).
Log in to cPanel & set the PHP version
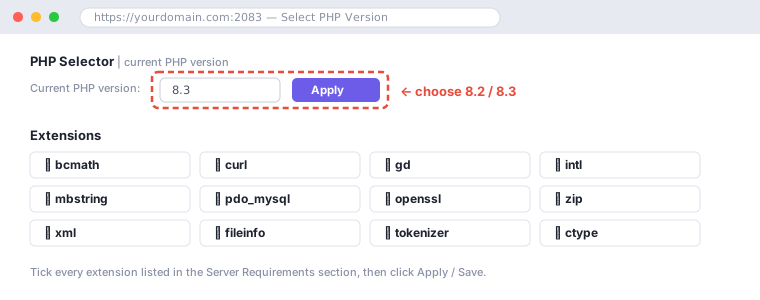
Log in to cPanel (usually https://yourdomain.com/cpanel or https://yourdomain.com:2083). Open Select PHP Version (sometimes called MultiPHP Manager) under the Software section, choose PHP 8.3 or 8.4, and make sure the extensions listed in Server Requirements are ticked.
Upload main.zip with File Manager
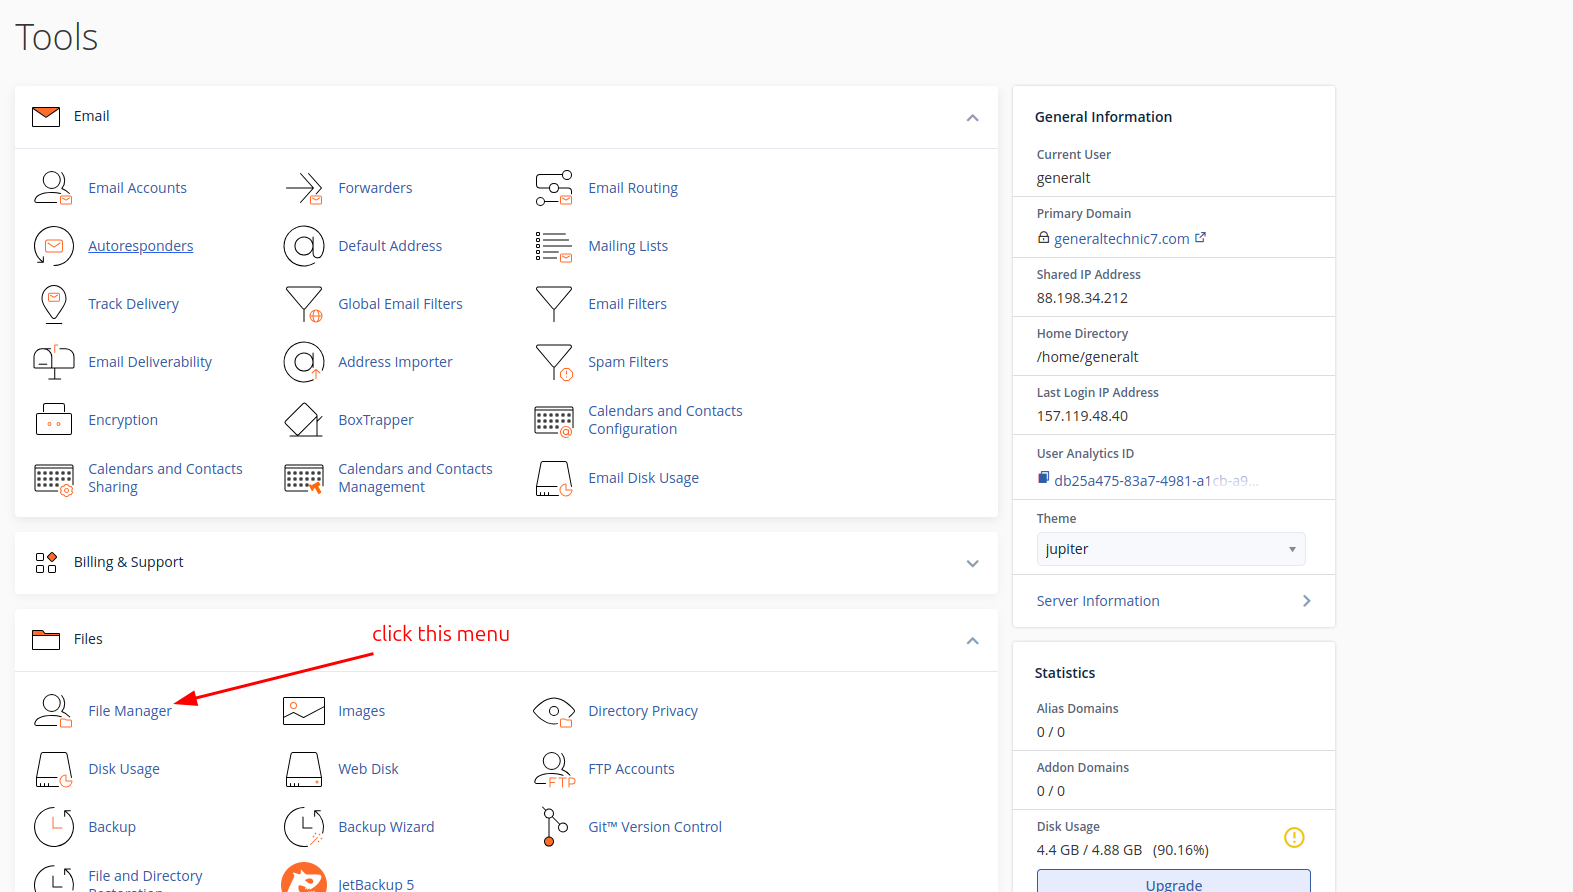
From the cPanel home screen, open File Manager (under the Files group):
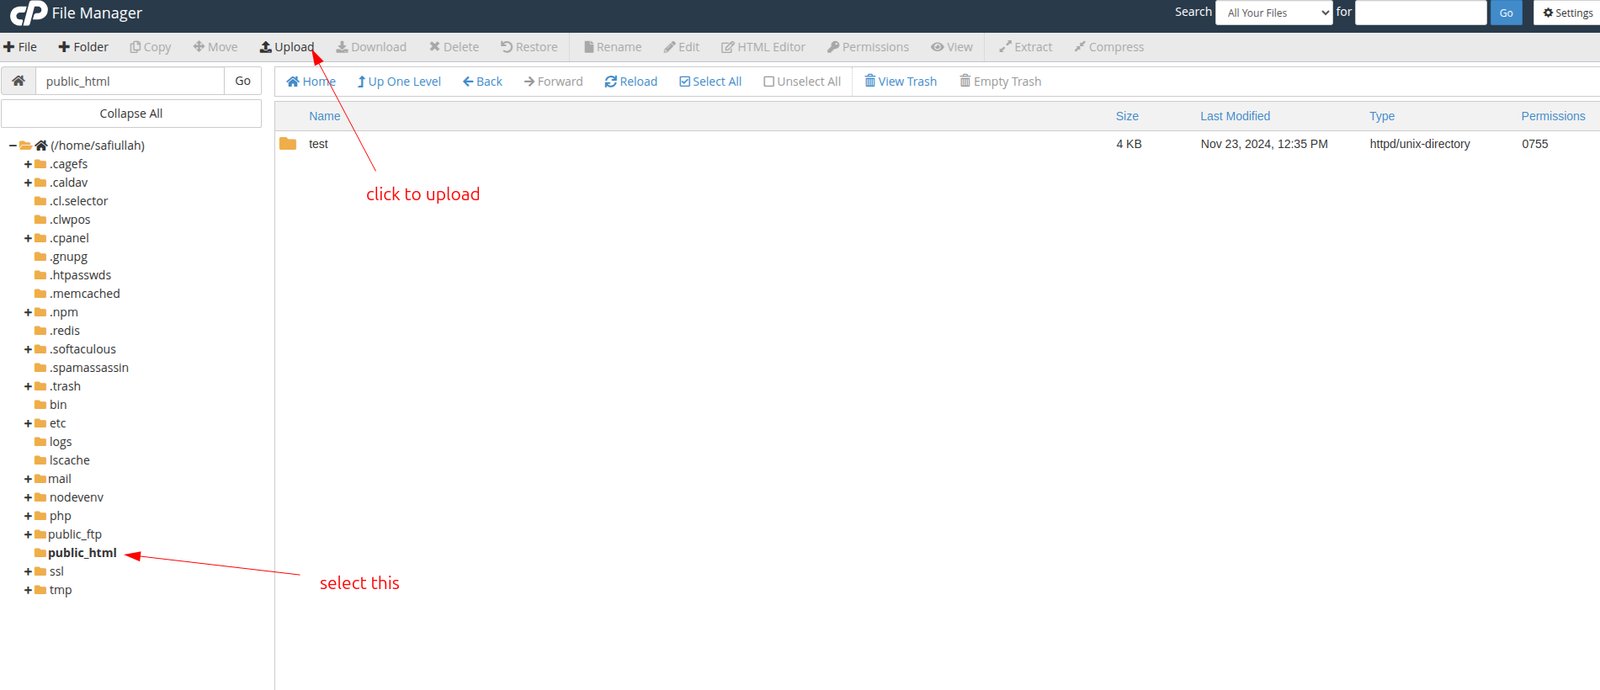
Select the public_html folder in the left tree (or the folder of the domain/subdomain you want to install on) and click Upload in the toolbar:
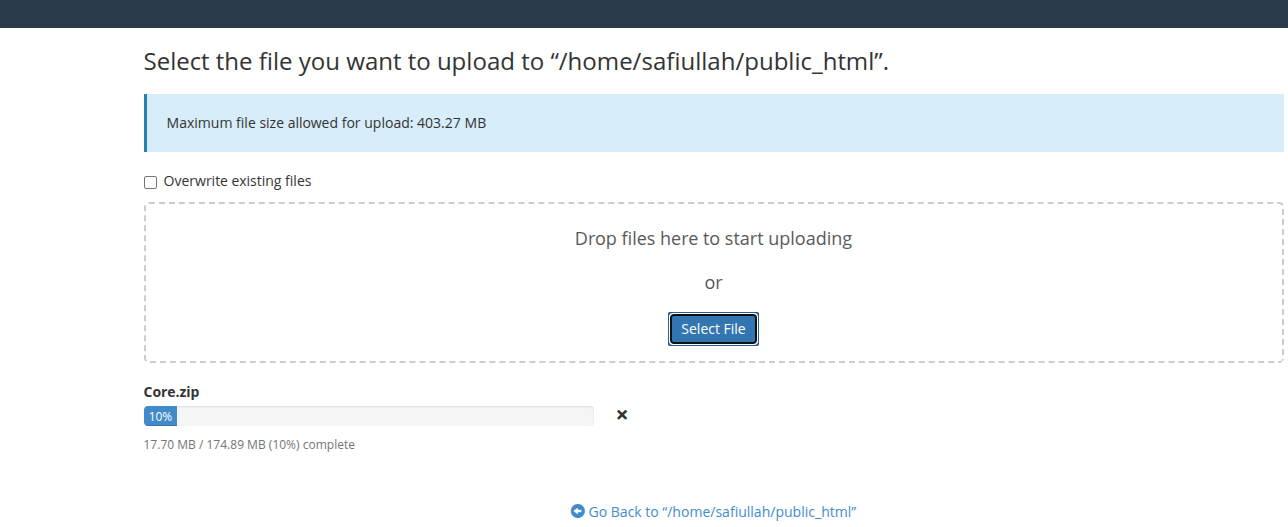
Drop main.zip into the upload area (or click Select File) and wait for the progress bar to reach 100%:
Extract the zip
Back in File Manager, right-click main.zip → Extract, extracting into public_html itself. Afterwards you should see index.php, .htaccess, assets/ and system/ directly inside public_html. You can then delete main.zip.
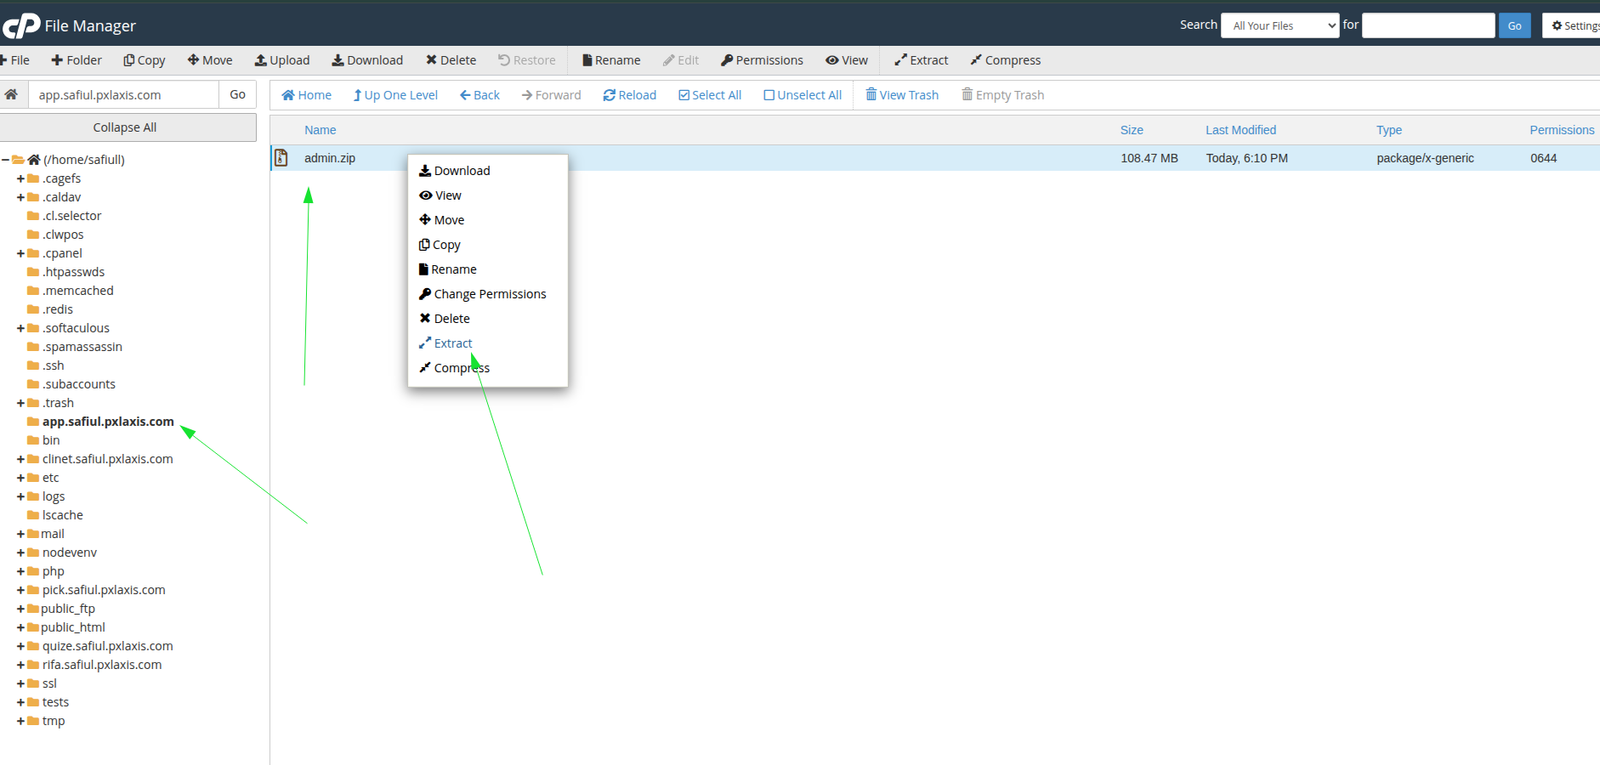
.htaccess or system/.env.Create the MySQL database & user
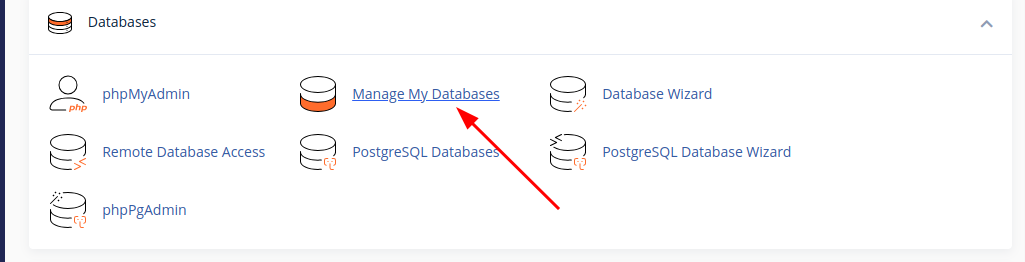
From the cPanel home screen, open Manage My Databases (under Databases; on some hosts it's called MySQL® Databases — the Database Wizard works too):
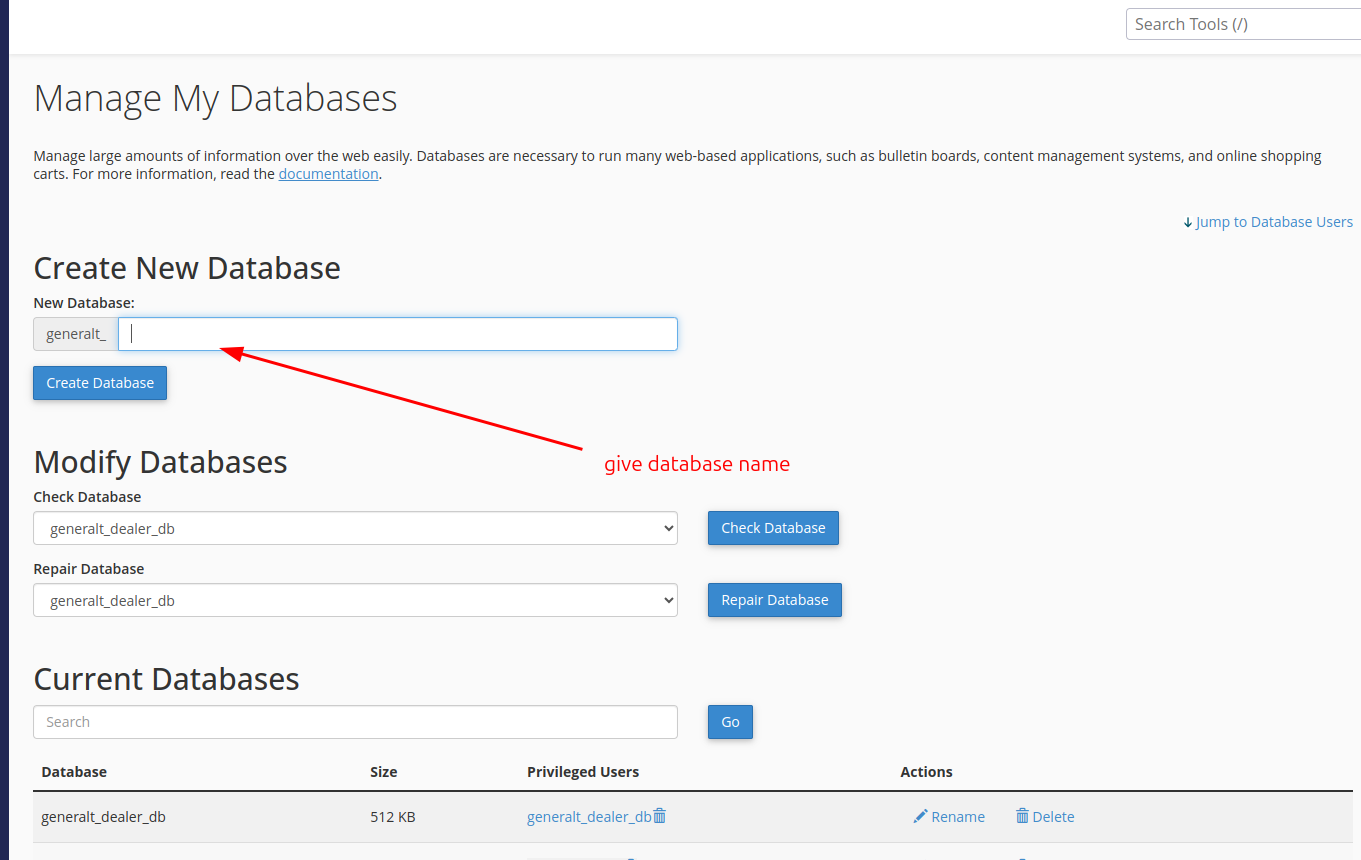
Under Create New Database, enter a name (e.g. neuraldesk) and click Create Database:
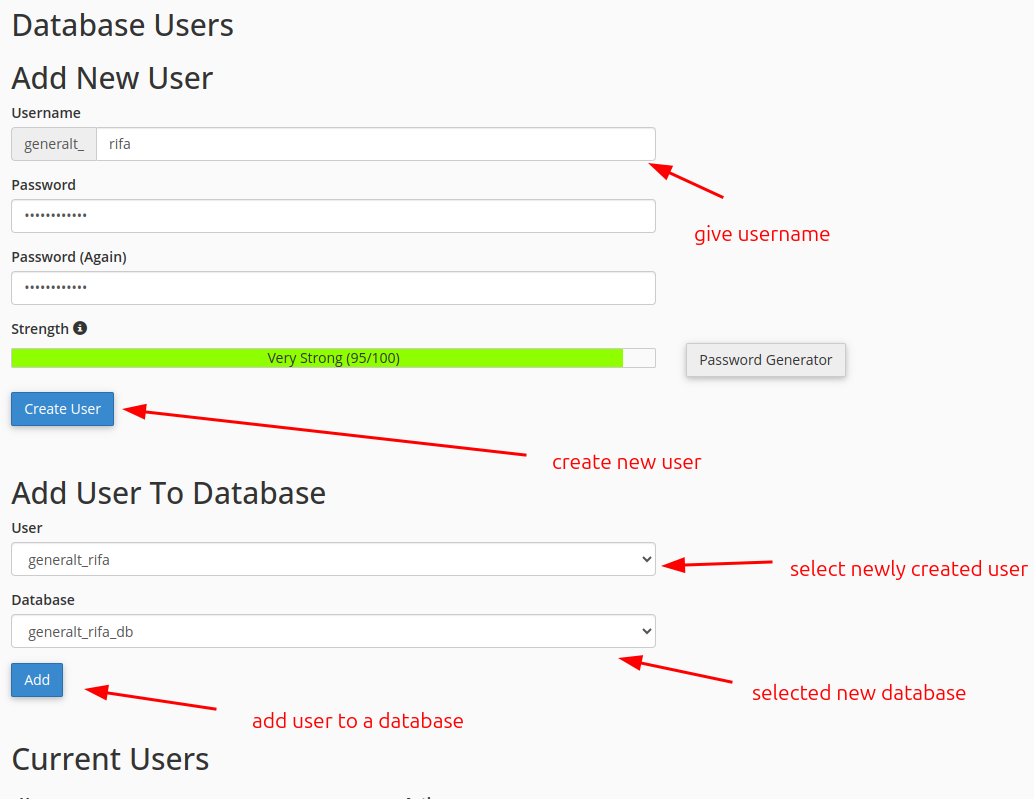
Scroll to Add New User, create a database user with a strong password, then under Add User To Database select the new user and database and click Add:
On the privileges screen, tick ALL PRIVILEGES and click Make Changes. Note down the database name, username and password — you'll need them in the next step.
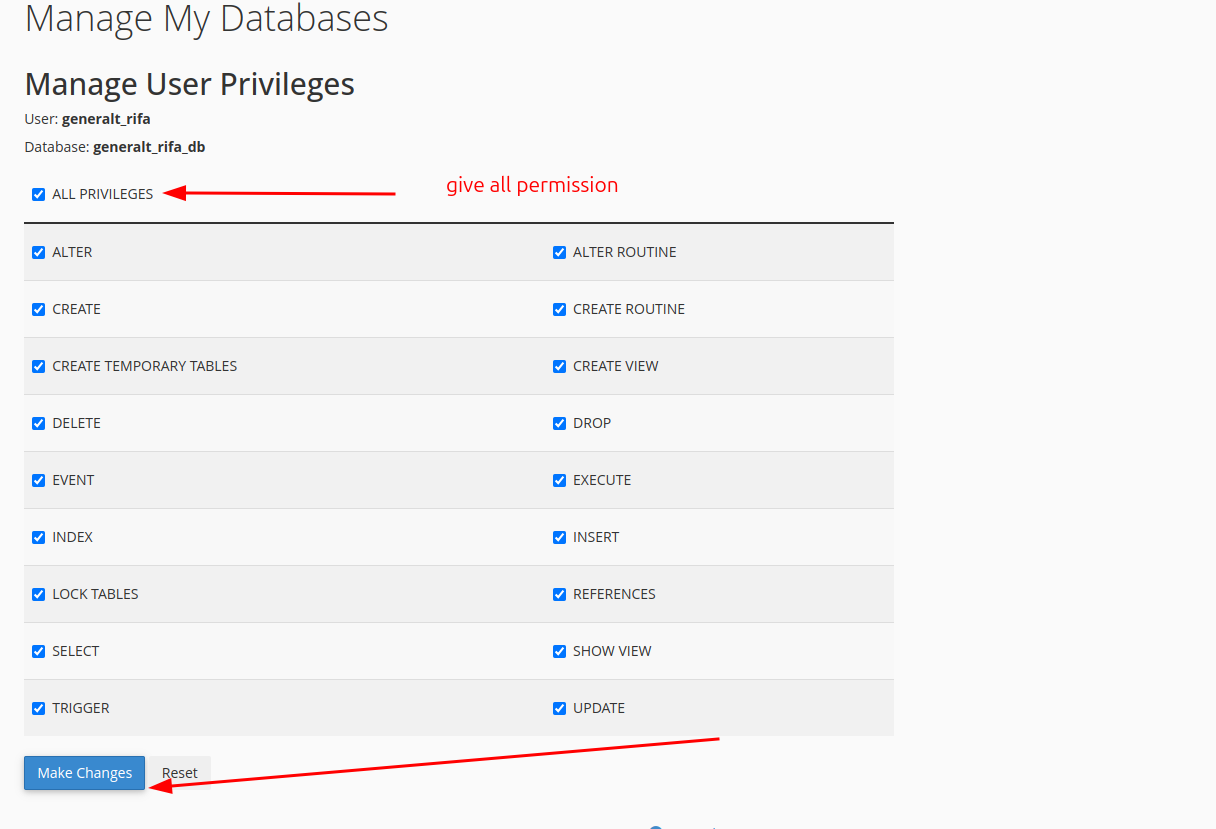
youruser_neuraldesk and user youruser_dbuser. Use the full prefixed names in .env.Edit system/.env
In File Manager, open the system folder, right-click .env → Edit, and set your URL and database values. Only change these lines — leave everything else (including APP_KEY) exactly as shipped:
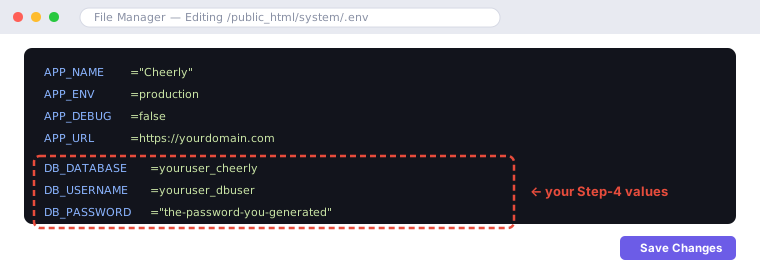
See the full list of options in Environment (.env).
Import the database with phpMyAdmin
From the cPanel home screen, open phpMyAdmin (under Databases):
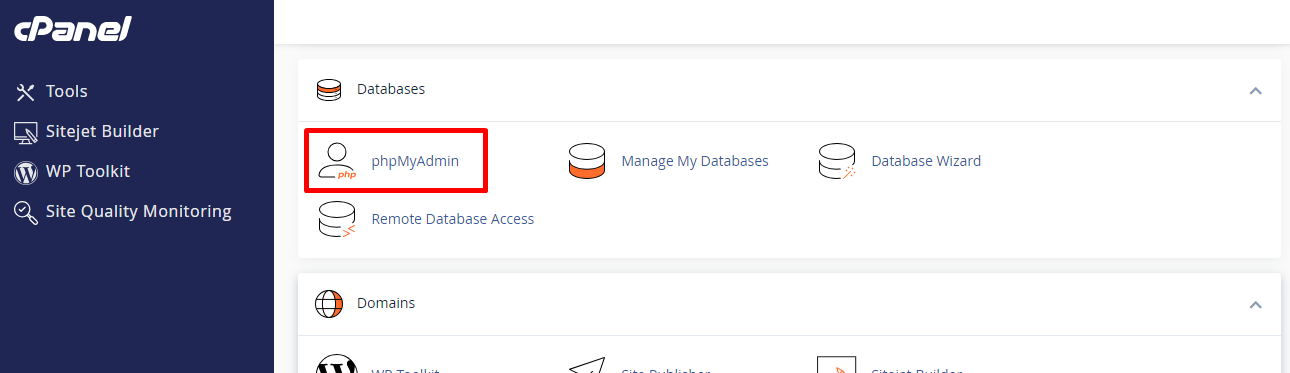
In phpMyAdmin, click your database in the left sidebar (the one you created in Step 4), open the Import tab, click Choose File, select the database.sql file from your package's Database folder, and press Go. When the green success message appears, all tables and starter data are in place — no terminal commands needed.
Add the cron jobs
Open Cron Jobs (under Advanced) and add these two jobs, both on an every-minute schedule (choose the "Once Per Minute" common setting or enter * * * * *):
/usr/local/bin/php /home/YOURUSER/public_html/system/artisan schedule:run >> /dev/null 2>&1
/usr/local/bin/php /home/YOURUSER/public_html/system/artisan queue:work --stop-when-empty >> /dev/null 2>&1
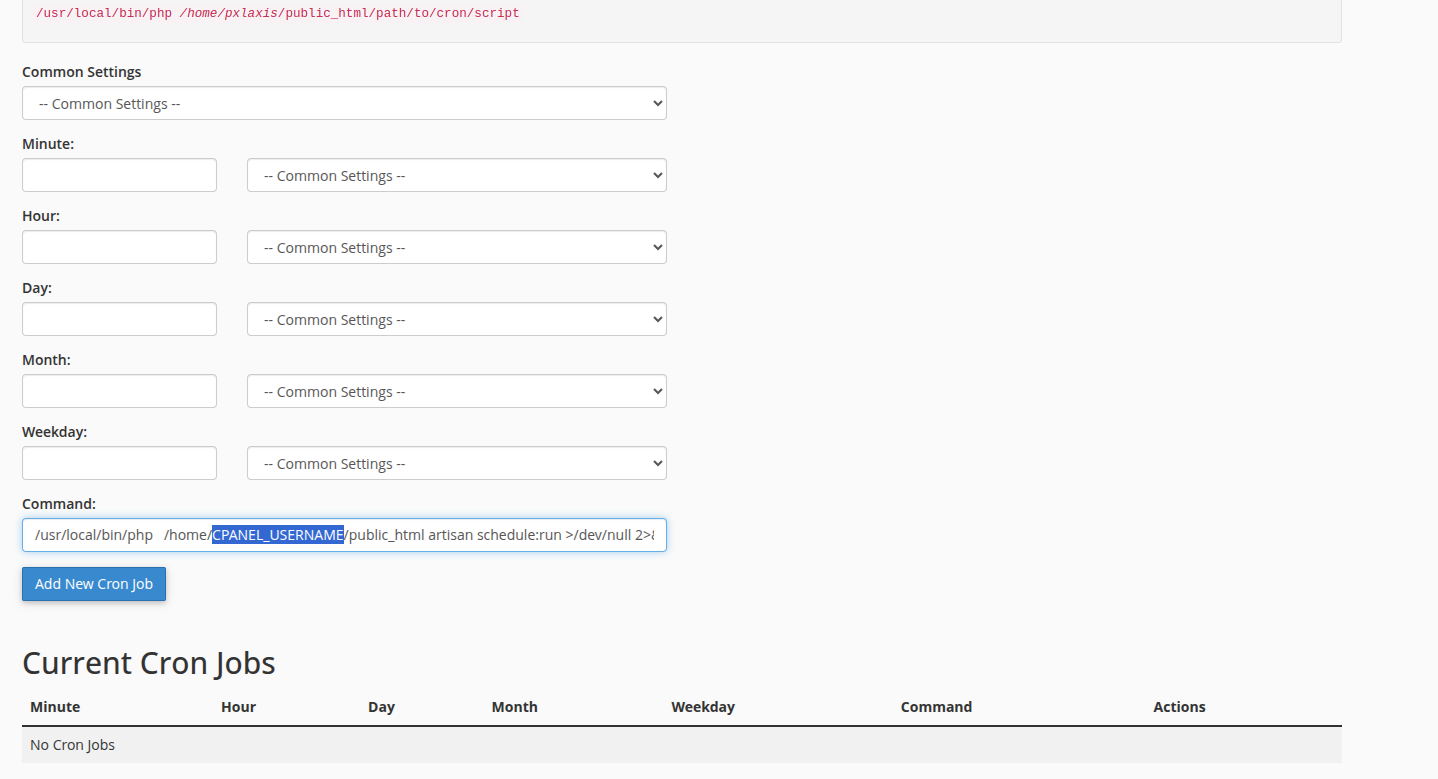
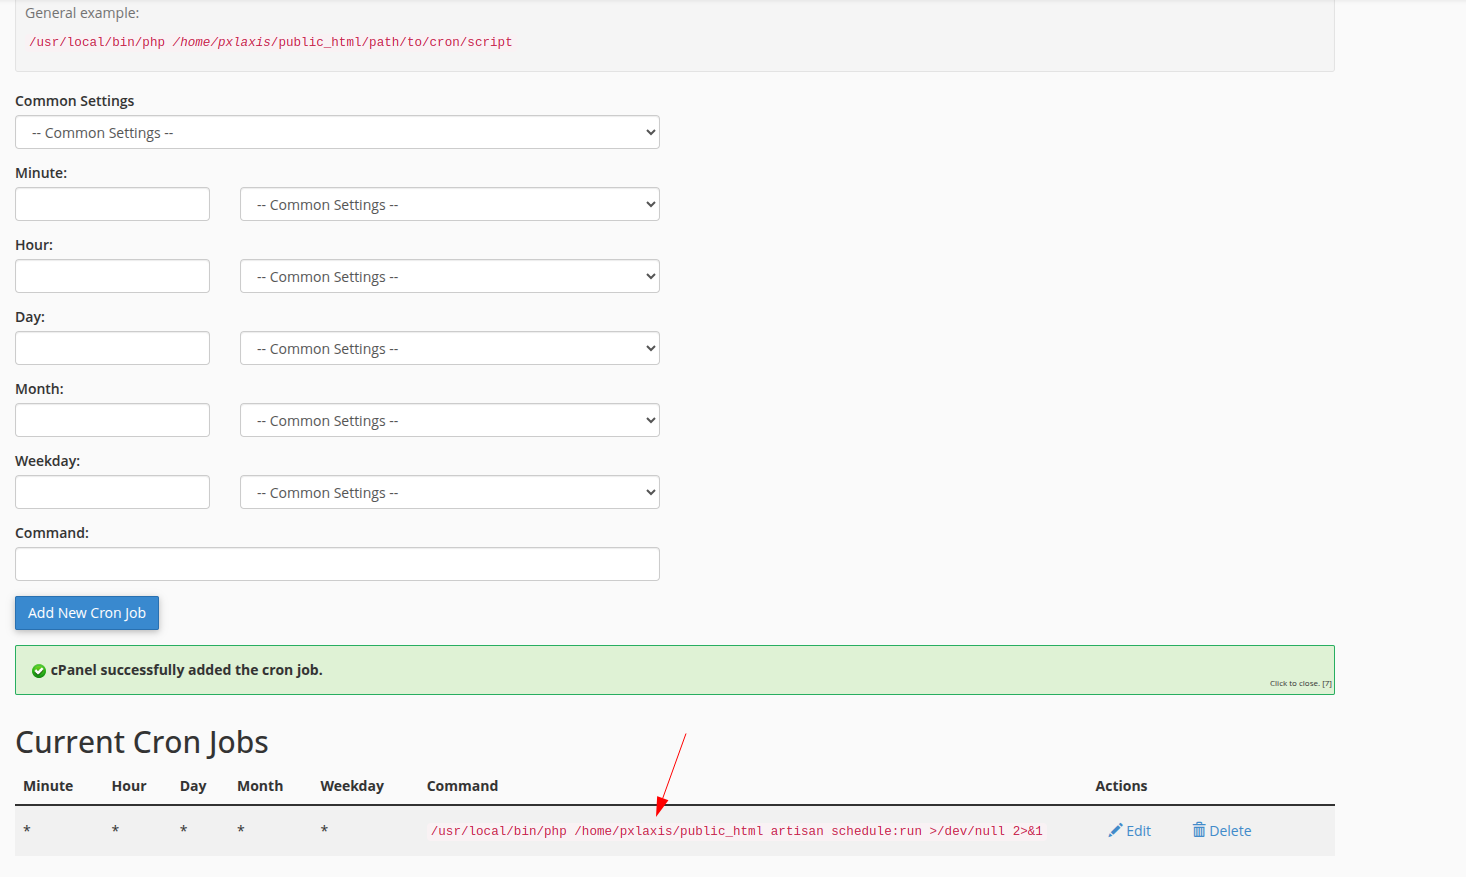
Details on why both are needed: Cron Jobs & Queue.
Open your site 🎉
Visit https://yourdomain.com — the landing page should load. Log in to the admin panel at https://yourdomain.com/admin/login with the default credentials, then complete the post-installation steps (change passwords, set up mail, branding).
Install on Hostinger Pictorial Guide
Hostinger uses its own hPanel instead of cPanel — same five moves, different buttons.
Set the PHP version
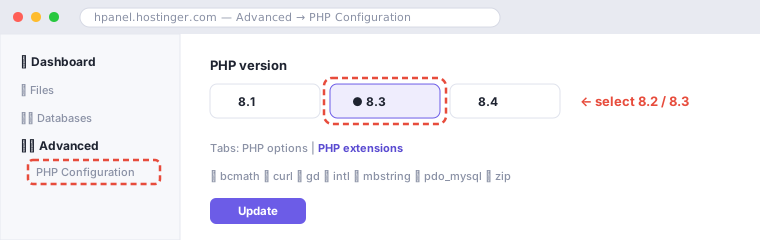
Log in at hpanel.hostinger.com, open your website, then go to Advanced → PHP Configuration. Select PHP 8.3 or 8.4, and under the PHP extensions tab make sure the required extensions are enabled (most are on by default). Click Update.
Upload & extract main.zip
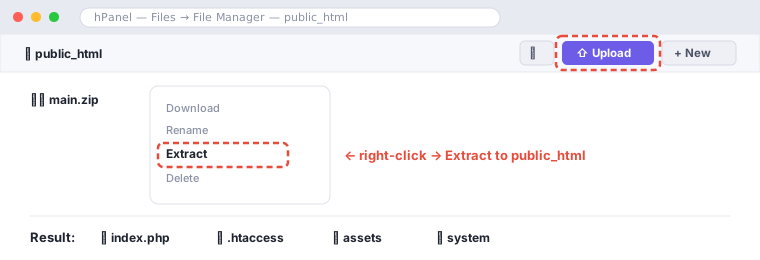
Go to Files → File Manager, open the public_html folder, click the Upload icon (top-right) → File, and upload main.zip. When it finishes, right-click the zip → Extract, extracting to public_html. Delete the zip afterwards.
.env, .htaccess) are shown by default in newer versions; if you don't see them, enable "Show hidden files" from the ⚙ settings menu.Create the MySQL database
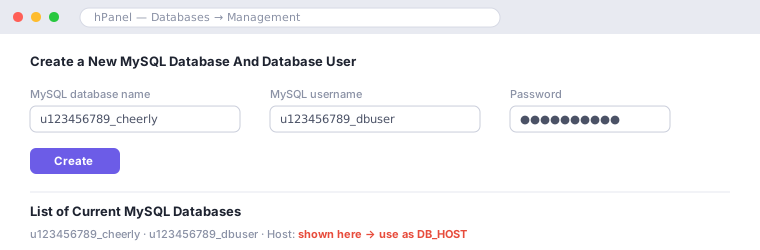
Go to Databases → Management. Fill in the Create a New MySQL Database And Database User form (database name, username, password) and click Create. Hostinger grants the user full privileges automatically. Note the values — including the host, which on Hostinger is often something like localhost or a value shown in the database list (e.g. mysql.hostinger.com / an IP) — you'll need it for DB_HOST.
Edit system/.env
In File Manager, open public_html/system and double-click .env to edit it. Only change these lines — leave everything else (including APP_KEY) exactly as shipped:
APP_ENV=production
APP_DEBUG=false
APP_URL=https://yourdomain.com

DB_CONNECTION=mysql
DB_HOST=localhost        # or the host shown in hPanel's database list
DB_PORT=3306
DB_DATABASE=u123456789_neuraldesk
DB_USERNAME=u123456789_dbuser
DB_PASSWORD="your-database-password"Import the database with phpMyAdmin
Go to Databases → Management, find your database in the list, and click Enter phpMyAdmin. Select the database in the left sidebar, open the Import tab, choose the database.sql file from your package's Database folder, and press Go. When the success message appears, all tables and starter data are in place — no terminal or SSH needed.
Add the cron jobs
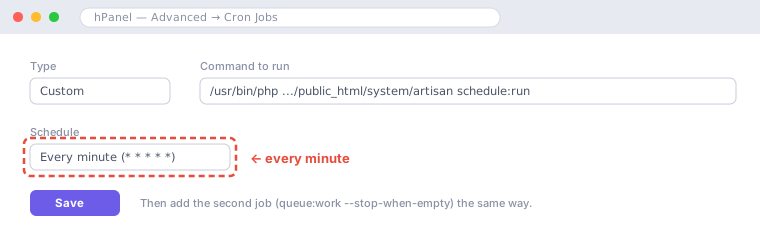
Go to Advanced → Cron Jobs. Choose type PHP or Custom, set the schedule to every minute, and add these two jobs:
/usr/bin/php /home/u123456789/domains/yourdomain.com/public_html/system/artisan schedule:run
/usr/bin/php /home/u123456789/domains/yourdomain.com/public_html/system/artisan queue:work --stop-when-empty
Open your site 🎉
Visit your domain — the landing page should load. Log in at /admin/login with the default credentials and complete the post-installation steps.
Install on VPS / Localhost Developers
For Ubuntu/Debian VPS, Laravel Forge/Ploi, XAMPP, Laragon or Herd — anywhere you have a shell, Composer and Node.
Requirements: PHP 8.3+ and MySQL. No Composer or Node.js needed — the package ships with vendor/ and pre-built assets. Point your web server's document root at the project root (the folder containing index.php), not at system/public.
# 1. Put the contents of the package's Files folder in place (e.g. /var/www/yourapp)
cp -r Files/. /var/www/yourapp/

# 2. Configure — edit system/.env (APP_URL + DB_*), leave APP_KEY as shipped
nano /var/www/yourapp/system/.env

# 3. Import the database (or use phpMyAdmin if you have it)
mysql -u youruser -p yourdatabase < Database/database.sql

# 4. Permissions
chown -R www-data:www-data /var/www/yourapp
chmod -R 775 /var/www/yourapp/system/storage /var/www/yourapp/system/bootstrap/cache
Scheduler & queue (VPS)
Add the scheduler to the crontab and run a persistent queue worker (Supervisor recommended):
* * * * * php /var/www/yourapp/system/artisan schedule:run >> /dev/null 2>&1
[program:yourapp-worker]
command=php /var/www/yourapp/system/artisan queue:work --sleep=3 --tries=3
autostart=true
autorestart=true
user=www-data
numprocs=1
stdout_logfile=/var/www/yourapp/system/storage/logs/worker.log
Local development (only if customizing the source)
Buyers modifying the code will want Composer 2 and Node.js 20+ for rebuilding assets and running the dev stack:
cd system
npm install
composer run dev   # serves the app + Vite dev server + queue listener together
Post-Installation Steps
Do these immediately after your first successful login.
- Change all default passwords. The seeded accounts (see Default Logins) all use the password
password. Change the admin password and delete or repurpose the demo accounts. - Set up email. Without SMTP configured, invites, password resets and notifications go nowhere. See Email / SMTP.
- Brand the site. Admin Panel → Settings: site name, logo, favicon, colors; Admin → Frontend to edit landing-page sections, menus and themes.
- Configure payment gateways you want to accept — see Payment Gateways. Delete/disable the "Log" test gateway in production.
- Review pricing plans & currencies in the admin panel and replace demo plans with your real offering.
- Remove demo content (demo users, blogs, testimonials, sample payments) or reinstall with a clean seed if you prefer no demo data.
- Confirm
APP_DEBUG=falseandAPP_ENV=productioninsystem/.env. - Verify the cron jobs run — after a few minutes, Admin → any queued action (e.g. a test notification) should process automatically.
APP_DEBUG=true — debug mode exposes secrets in error pages.Environment (.env) Reference
All configuration lives in system/.env. Changes take effect on the next page load — just save the file.
| Key | Purpose |
|---|---|
APP_NAME | Application name used in emails and titles. |
APP_ENV / APP_DEBUG | Use production / false on a live site. Set APP_DEBUG=true only temporarily while troubleshooting. |
APP_KEY | Encryption key — ships pre-set in the package. Never change, clear or share it (changing it invalidates encrypted data). |
APP_URL | Full URL of your site including https://. Must match the real domain or asset/redirect URLs break. |
DB_HOST / DB_PORT / DB_DATABASE / DB_USERNAME / DB_PASSWORD | Your MySQL credentials from the installation steps. |
MAIL_* | SMTP settings — see Email / SMTP. |
QUEUE_CONNECTION | Defaults to database (recommended on shared hosting). redis supported on VPS. |
VAPID_SUBJECT / VAPID_PUBLIC_KEY / VAPID_PRIVATE_KEY | Web push keys — see Push Notifications. |
FIREBASE_CREDENTIALS | Path to a Firebase service-account JSON for FCM mobile/web push (optional). |
.env — they're entered in the admin panel and stored (encrypted) in the database. See Payment Gateways.Cron Jobs & Queue
Two background processes keep the app alive. Skipping this section is the #1 cause of "emails not sending".
1. The scheduler
Runs time-based tasks (e.g. scheduled campaigns and periodic clean-ups managed from Admin → Scheduler). One cron entry, every minute:
* * * * * php /path/to/your/site/system/artisan schedule:run >> /dev/null 2>&1
2. The queue worker (optional)
Out of the box the app runs with QUEUE_CONNECTION=sync — emails and notifications are sent inline, so no queue worker is required. If you switch to QUEUE_CONNECTION=database in .env for faster page responses under load, add this second cron (shared hosting) or run a persistent worker under Supervisor on a VPS (see VPS install):
* * * * * php /path/to/your/site/system/artisan queue:work --stop-when-empty >> /dev/null 2>&1
/usr/local/bin/php; on Hostinger /usr/bin/php. Your absolute site path is visible in File Manager (e.g. /home/youruser/public_html or /home/u123456789/domains/yourdomain.com/public_html).php artisan queue:work --stop-when-empty manually shows the jobs being processed.AI Providers & Chatbots
Connect an AI provider once from the admin panel — every subscriber's chatbot uses it.
1. Enable a text provider
- Go to Admin Panel → AI Settings.
- Enable a provider (OpenAI, Anthropic, Gemini, Groq, Mistral, DeepSeek, xAI, Cohere, …) and paste its API key.
- Set it as the Default text provider and save.
2. Optional: vector search (embeddings)
Out of the box, chatbots answer using keyword retrieval over their trained knowledge — no extra services needed. For smarter semantic retrieval, enable an embeddings provider in AI Settings and pick a vector store there too: dependency-free file vectors, or a Qdrant instance (URL, API key and collection are all entered in the same AI Settings screen).
3. How subscribers use it
- Dashboard → Chatbots — create a bot, set its persona, greeting and starter questions.
- Training — add knowledge: documents, Q&A pairs or free text.
- Widget — copy the embed snippet and paste it before
</body>on any website. Optionally restrict the widget to specific domains. - Conversations — watch visitor chats live; when the bot can't answer (or AI is disabled), the conversation is flagged Needs human reply and agents can take over.
Realtime (Pusher)
Optional instant updates for the conversations inbox. Without it, the app falls back to polling automatically — nothing to configure.
- Create a (free) app at dashboard.pusher.com → Channels.
- Go to Admin Panel → Settings → Realtime, enable Pusher, and paste the App ID, Key, Secret and Cluster.
- Save — new handoff conversations now appear (and ring) in agents' inboxes instantly, with no page refresh and no queue worker required.
Email / SMTP
Required for invites, password resets, digests and notification emails.
Add these lines to system/.env (they may not exist yet — just append them), using credentials from your host's email account, or a transactional provider (Brevo, Mailgun, Postmark, Amazon SES, Resend, Gmail SMTP):
MAIL_MAILER=smtp
MAIL_HOST=smtp.yourprovider.com
MAIL_PORT=587
MAIL_USERNAME=you@yourdomain.com
MAIL_PASSWORD="your-smtp-password"
MAIL_ENCRYPTION=tls
MAIL_FROM_ADDRESS=you@yourdomain.com
MAIL_FROM_NAME="${APP_NAME}"
Typical values: port 587 with tls, or port 465 with ssl. For a cPanel/Hostinger mailbox, the host is usually mail.yourdomain.com and the username is the full email address.
After saving, send yourself a password-reset email to verify it works. Notification email content is editable under Admin → Notification Templates.
MAIL_MAILER falls back to log — emails are written to system/storage/logs/laravel.log instead of being sent. That's why mail "doesn't work" until you configure SMTP.Payment Gateways
Configured entirely from the admin panel — no code or .env editing needed.
Go to Admin Panel → Payment Gateways. Each gateway has an enable toggle, credential fields, optional fees, min/max limits and supported currencies:
| Gateway | Credentials you need | Where to get them |
|---|---|---|
| Stripe | Publishable key, Secret key, Webhook secret | dashboard.stripe.com → Developers → API keys |
| PayPal | Client ID, Secret, Sandbox on/off | developer.paypal.com → My Apps & Credentials |
| Razorpay | Key ID, Key Secret | dashboard.razorpay.com → Settings → API Keys |
| Paystack | Public key, Secret key | dashboard.paystack.com → Settings → API Keys |
| Flutterwave | Public key, Secret key, Encryption key | dashboard.flutterwave.com → Settings → API |
| Manual / Offline | Instructions text (bank transfer details etc.) | — payments are marked pending until you approve them |
- Webhooks: where a gateway offers webhooks (Stripe in particular), set the webhook URL shown on that gateway's settings page in the admin panel, so payment confirmations arrive even if the customer closes the browser.
- Currencies: manage exchange rates and enabled currencies under Admin → Currencies; each gateway only shows for currencies it supports.
- Testing: a "Log" test driver is included for development — disable it in production. Refunds are handled under Admin → Payments → Refunds.
Push Notifications
Browser (web push) and Firebase Cloud Messaging support — both optional.
Web Push (VAPID)
- Generate a VAPID key pair and paste it into
system/.env(VAPID_PUBLIC_KEY,VAPID_PRIVATE_KEY). If you have terminal access,php artisan webpush:vapidgenerates them for you; otherwise use any online VAPID key generator or ask our support. - Set
VAPID_SUBJECT=mailto:you@yourdomain.com. - Web push requires HTTPS. Users are prompted to allow notifications in their browser.
Firebase Cloud Messaging (FCM)
- Create a project at console.firebase.google.com → Project settings → Service accounts → Generate new private key (downloads a JSON file).
- Upload the JSON somewhere private, e.g.
system/storage/app/firebase.json. - Set
FIREBASE_CREDENTIALS=/home/youruser/public_html/system/storage/app/firebase.jsonin.env.
webpush:vapid complains about OpenSSL, point OPENSSL_CONF to your XAMPP OpenSSL config (e.g. C:\xampp\apache\conf\openssl.cnf) as noted in system/.env.Google reCAPTCHA
Protects the login/registration forms from bots.
- Register your domain at google.com/recaptcha/admin — choose reCAPTCHA v2 ("I'm not a robot" checkbox) — and copy the site key and secret key.
- Go to Admin Panel → Settings, enable the reCAPTCHA (v2) feature, and paste the Site Key and Secret Key. Save — no file editing required.
To turn it off (e.g. on a staging server), simply disable the reCAPTCHA feature toggle in the same settings page.
Default Logins & Panels
Accounts created by the database seeder. Change every password immediately after install.
| Role | Login URL | Password | |
|---|---|---|---|
| Super Admin | /admin/login | admin@example.com | password |
| Subscriber (User) | /login → lands on /dashboard | testuser@example.com | password |
| Demo users | /login | olivia.bennett@example.com, liam.carter@example.com, sophia.nguyen@example.com, … | password |
The seeder also loads demo content (payments, blogs, support tickets, a demo chatbot with trained knowledge and sample conversations, plans) so every screen looks populated. Remove demo data from the admin panel before going live, or seed a clean install by running only the essential seeders.
password are public knowledge (they're in this documentation). Leaving them unchanged on a live site is an open door.Frontend / CMS
The public marketing site is fully manageable from the admin panel.
- Pages & sections — Admin → Frontend: edit the landing page hero, feature sections, pricing section, FAQ, and create additional pages.
- Menus — build header/footer navigation menus and assign links.
- Themes — switch between the bundled frontend themes and adjust theme settings.
- Blog — write posts with categories; posts appear on the frontend blog.
- Testimonials & Newsletter — manage testimonials shown on the landing page; view and export newsletter subscribers.
- Home page settings — control which sections appear and in what order.
Media uploaded through the CMS is managed centrally in Admin → Media and stored under system/storage — keep that folder out of any manual cleanup and always include it in backups.
Languages & Translation
Ship the app in any language — no code editing required.
- Go to Admin → Languages to add a language, set it as default, or disable one.
- Use the built-in translation editor to translate interface strings per language.
- RTL layouts are handled by the theme where applicable.
Updating the App
When a new version is released on CodeCanyon.
- Back up first — download a copy of your files and export your database (phpMyAdmin → Export). Non-negotiable.
- Download the latest package from your CodeCanyon Downloads page.
- Zip the new package's
Filesfolder contents (same as during installation), then upload and extract it over your existing files. Do not overwritesystem/.envor thesystem/storage/folder (your uploads and logs live there). - If the release includes database changes, the update package contains an
update.sql— import it via phpMyAdmin → Import, exactly like during installation.
Release notes on the item page will mention any version-specific steps — always read them before updating.
Troubleshooting / FAQ
The issues we see most, and their fixes.
I get a 500 error / blank page right after installing
Almost always one of: (1) wrong DB credentials in system/.env; (2) APP_KEY accidentally deleted while editing .env — restore the shipped value from your download package; (3) storage permissions — in File Manager, set system/storage and system/bootstrap/cache (recursively) to 775; (4) PHP version below 8.3. To see the real error, temporarily set APP_DEBUG=true in .env, reload, fix, then set it back to false. The full error log is at system/storage/logs/laravel.log.
Emails (invites, password reset) are not being sent
Two separate things must be true: SMTP is configured (Email / SMTP — the default mailer only writes to the log file), and the queue worker cron job is running (Cron Jobs & Queue). Test SMTP with a password reset; test the queue by running php artisan queue:work --stop-when-empty manually.
The site loads but CSS/JS or images are broken
Check that APP_URL in .env exactly matches your domain (including https://) and reload with a cleared browser cache. Also verify the assets/ folder extracted completely. If you installed in a subfolder, the app detects its base path automatically — but APP_URL should include the subfolder too.
404 on every page except the homepage
The .htaccess file is missing (it's a hidden file — enable "show hidden files" in File Manager and re-extract if needed) or Apache's mod_rewrite/AllowOverride is disabled — ask your host to enable it. On Nginx, add the standard Laravel try_files $uri $uri/ /index.php?$query_string; rule.
"SQLSTATE[HY000] [1045] Access denied" during migrate
The DB username/password in .env is wrong, or the user wasn't granted privileges on the database. Re-check the values (remember cPanel/Hostinger prefixes like youruser_) and re-run Step 3 of the wizard (Add User To Database → ALL PRIVILEGES).
Payments succeed at the gateway but stay "pending" in the app
Configure the gateway's webhook URL (shown on the gateway settings page in the admin panel) in your Stripe/PayPal dashboard, and make sure the queue worker cron is running — webhook processing is queued.
The scheduled weekly digest never arrives
The schedule:run cron entry is missing or points to the wrong path/PHP binary. Verify by running the cron command manually in the terminal — it should print the scheduled tasks. The digest is sent Mondays at 08:00 server time.
How do I install in a subdirectory or on a subdomain?
Both work. For a subdomain, create it in your hosting panel and extract main.zip into the subdomain's document root instead of public_html. For a subdirectory (e.g. /app), extract into that folder and set APP_URL=https://yourdomain.com/app.
Can I use PostgreSQL or SQLite?
The product is developed and tested against MySQL/MariaDB. Laravel technically supports other drivers, but we only provide support for MySQL/MariaDB installations.
Where is the REST API documentation?
The API is secured with Laravel Sanctum and documented with Swagger. After installation, the interactive API docs are available at /api/documentation (generate with php artisan l5-swagger:generate if the page is empty).
Support & Credits
We're happy to help with installation and product issues.
- Support portal: https://pixelaxis.net/support — open a ticket for the fastest response.
- Item comments: ask questions on the CodeCanyon item page — we reply on business days.
- When contacting support, include: your purchase code, your host (cPanel/Hostinger/VPS), PHP version, and the last ~50 lines of
system/storage/logs/laravel.logif it's an error.
Support covers installation help, bug fixes and answering product questions. It does not cover custom feature development or server administration — but we can quote customization work on request.
Built with
Laravel · Tailwind CSS · Alpine.js · Vite · ApexCharts · Chart.js · GSAP · Spatie Permissions · Laravel Sanctum · Laravel Socialite — thanks to these wonderful open-source projects.
Thank you again for your purchase — a ⭐⭐⭐⭐⭐ rating on CodeCanyon helps us a lot!
Social Login API / Mobile only
Optional Google / Facebook / GitHub sign-in for API clients and mobile apps, via Laravel Socialite.
/api/v1/auth/social/…) for mobile apps or custom integrations. The standard web login/register pages do not show social buttons — if you're not building against the API, you can skip this section entirely.https://yourdomain.com/api/v1/auth/social/{provider}/callback(e.g.…/social/google/callback).Native mobile apps can alternatively exchange a provider token directly via
POST /api/v1/auth/social/{provider}/mobile— see the API documentation at/api/documentation.